

 Log In


December 9, 2002
 Offline


In regards to these two models, and especially the early model 1873, as I’m not sure about reason that the “Bushing”, was used on the bolt, face where the firing pin extrudes, or strikes the cartridge, in the closed breach. These are evident naturally when the breach is opened, revealing the bolt face. I am aware that Winchester did modify the design on the later model 1873’s, and eliminated the bushing.
Not sure if the early M-1876 had this or not? Bill Hockett, please feel free to add you’re comments on this!
So my question is for Bob, (1873 man), TR, and others to comment here, why was it used or what was the purpose in these early designs?
Was the bushing a hardened material, (steel), for wear purposes, that Winchester decided possibly wasn’t needed?
Tony

May 2, 2009
Offline
From what I have seen the firing pin was the harder metal to keep the end from deforming and I haven’t seen any sign that the bushing was hardened. It could be that they made the bushing softer and made it a replaceable wear item. Later after the guns were being used for years they saw there was no issue with the firing pin and eliminated the bushing as a cost and production savings.
Bob
WACA Life Member---
NRA Life Member----
Cody Firearms member since 1991
Researching the Winchester 1873's
Email: [email protected]

April 30, 2023
Offline
1873man said
From what I have seen the firing pin was the harder metal to keep the end from deforming and I haven’t seen any sign that the bushing was hardened. It could be that they made the bushing softer and made it a replaceable wear item. Later after the guns were being used for years they saw there was no issue with the firing pin and eliminated the bushing as a cost and production savings.
Bob
That’s a very sound theory, actually…
December 9, 2002
Offline
Jeremy P said
1873man said
From what I have seen the firing pin was the harder metal to keep the end from deforming and I haven’t seen any sign that the bushing was hardened. It could be that they made the bushing softer and made it a replaceable wear item. Later after the guns were being used for years they saw there was no issue with the firing pin and eliminated the bushing as a cost and production savings.
Bob
That’s a very sound theory, actually…
I can understand that kind of thinking also.
Is the bushing a pressed in part? Not that I want to remove one, but they look almost pressed in. I’m sure that Winchester had a pretty snug fit on these so they wouldn’t come loose over time. I hadn’t seen any specs on these anywhere indicating the dimensions or the sizes of these.
Bob, If a firing pin on an early First Model, 73 src. has a “+”, sign on it, is that an indication that it was replaced? This would be my guess.
In reading up on Gordon’s book he states that a “123”, stamp or”CCC”, on the underside of the barrel, indicates three separate processes that was performed. Do we know what those three things were that we’re performed?
Thanks,
Tony

March 31, 2009
Offline
On the Henry and 66 the firing pin was screwed onto the rod that went all the way back to the hammer. This and a roll pin kept everything together including the bolt and extractor.
July 31, 2005
Offline
Anthony said
In regards to these two models, and especially the early model 1873, as I’m not sure about reason that the “Bushing”, was used on the bolt, face where the firing pin extrudes, or strikes the cartridge, in the closed breach. These are evident naturally when the breach is opened, revealing the bolt face. I am aware that Winchester did modify the design on the later model 1873’s, and eliminated the bushing.
Not sure if the early M-1876 had this or not? Bill Hockett, please feel free to add you’re comments on this!
So my question is for Bob, (1873 man), TR, and others to comment here, why was it used or what was the purpose in these early designs?
Was the bushing a hardened material, (steel), for wear purposes, that Winchester decided possibly wasn’t needed?
Tony
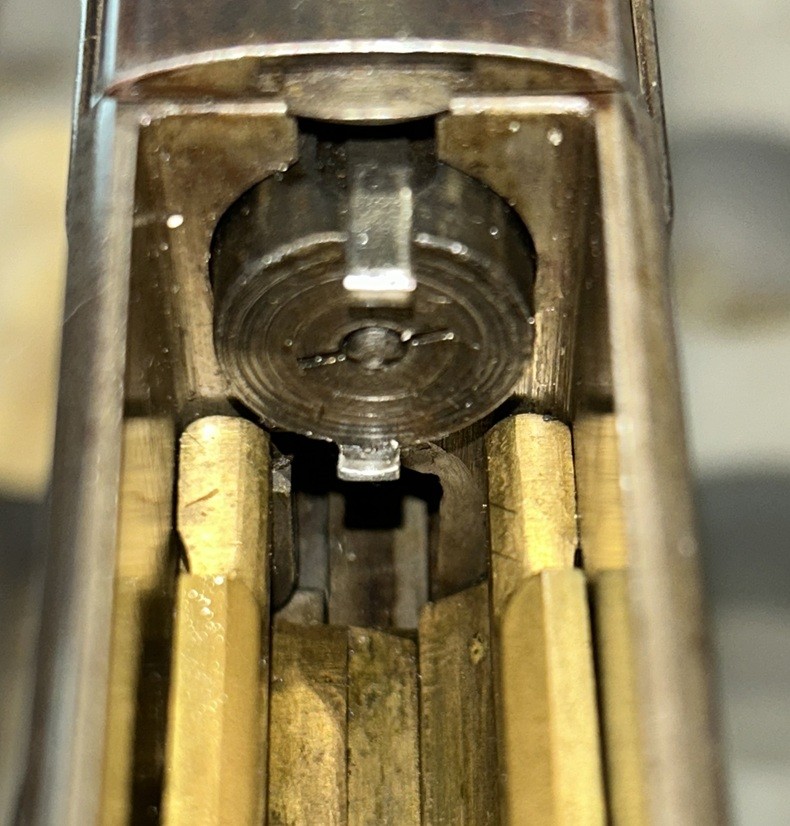
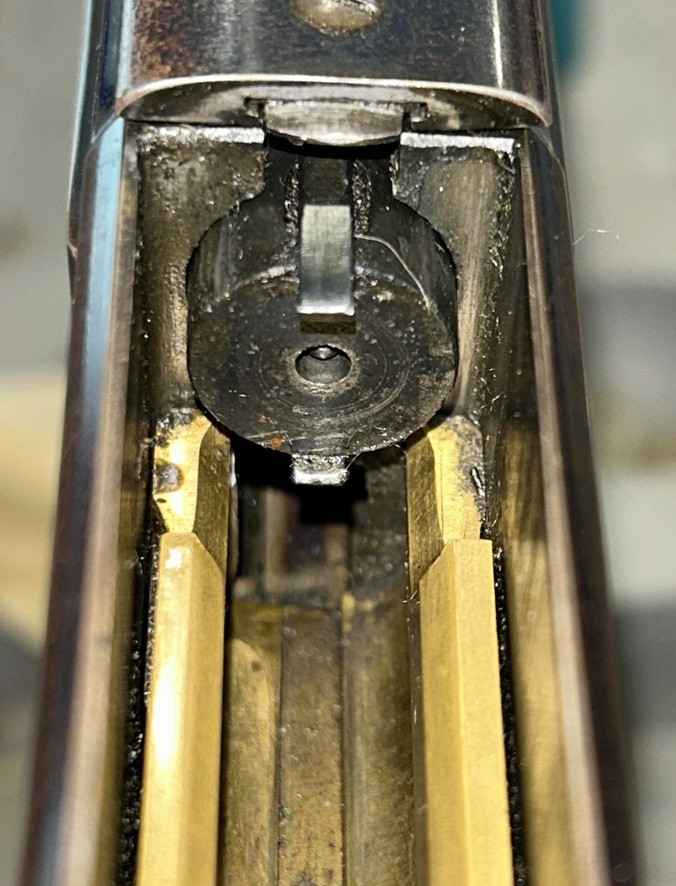
Tony, apparently the Model 1876 followed this design change like the Model 1873. Madis backs this up on page 233 of my 1 of 1000 edition of “The Winchester Book.”
See photos below. SN 9911 is a second model and has the bushing. SN 33812 is an early third model and has the solid face breechbolt.
I call myself a collector as it sounds better than hoarder
March 31, 2009
Offline
I should have explained that the busing was used to take up the terrible headspace the rimfires had. This moved the bolt face up against the case.
June 4, 2017
Offline
The bushing was extra machining, maybe they decided it wasn’t necessary. I’ve never seen a worn out hole in the bolt. T/R
May 2, 2009
Offline
Tony,
The Bushing on the first models like the top photo of Bill’s post you can see a slot on each side of the firing pin. With the pin removed you can put a common screwdriver in it and its threaded in. The bushing has a radius milled on the inside end of it that matches up with the radius of the pin so it had positive stop going forward.
What I understand is the 123 or CCC were 3 inspections or tests done to the barrel and was not the violent proof. You first had the CCC then for short time they had +++ right about the start of the 2nd model the the 123 showed up along with the VP proof.
I have seen the + on firing pins but not all and I have seen it on first model pins and on later ones. I never did a in depth look at it taking firing pins out to see if its a serial range thing but I would doubt its a replacement indication. My guess it was a inspection mark.
Bob
WACA Life Member---
NRA Life Member----
Cody Firearms member since 1991
Researching the Winchester 1873's
Email: [email protected]
December 9, 2002
Offline
First of all, I want to thank all you gentlemen for not only answering, and stepping up to the plate, so to speak, but the volumes of knowledge that came forward is second to none! 
Chuck, TR, Bill, Bob, and Jeremy,
The WACA Forum just keeps on rolling out, information along with it’s quality opinions!
Bob,
Thanks for setting me straight on the “+”, stamping on the firing pin. My assumption was premature! The slots make sense to me now as a flat bladed “turn screw”, would certainly do the trick! I would imagine it’s a fine thread and maybe proprietary to Winchester.
Bill,
With you’re pictures and explanations, you certainly spelled out, the difference and similarities of the M-1876, as I wasn’t sure.
Chuck, I completely understood you’re point, and TR, I am in full agreement with you, as far as being a step that wasn’t needed or required as Winchester, previously thought!
Tony
April 30, 2023
Offline
Anthony said
First of all, I want to thank all you gentlemen for not only answering, and stepping up to the plate, so to speak, but the volumes of knowledge that came forward is second to none!
Chuck, TR, Bill, Bob, and Jeremy,
The WACA Forum just keeps on rolling out, information along with it’s quality opinions!
Bob,
Thanks for setting me straight on the “+”, stamping on the firing pin. My assumption was premature! The slots make sense to me now as a flat bladed “turn screw”, would certainly do the trick! I would imagine it’s a fine thread and maybe proprietary to Winchester.
Bill,
With you’re pictures and explanations, you certainly spelled out, the difference and similarities of the M-1876, as I wasn’t sure.
Chuck, I completely understood you’re point, and TR, I am in full agreement with you, as far as being a step that wasn’t needed or required as Winchester, previously thought!
Tony
Just to be clear Anthony, I did absolutely nothing here! 
November 19, 2006
Offline
Tony –
Thanks for posting this. Like so many threads here, it’s an opportunity to increase my knowledge.
December 9, 2002
Offline
Jeremy,
You fell under the “quality opinions”, category which I appreciated.
steve004 said
Tony –
Thanks for posting this. Like so many threads here, it’s an opportunity to increase my knowledge.
You’re welcome Steve,
As we’ve talked in the past, it’s part of adding and keeping this Forum rolling. I too have learned a few things here.
Has anyone ever used a flat bladed screwdriver, and tried to, or removed the bushing in one of these early examples? I would sure imagine it would be a lot easier with the bolt out, and a straight, head on approach to the bolt face, for a solid fit of the blade. I would imagine these could be pretty tight, being in there so long, and probably torqued in on original installment.
The bolt secured in a jaw protected vise, to avoid the teeth marks on the bolt, with a larger quality screwdriver with the added hex on the shaft of the driver below the handle would probably be the right tool for this application. IMO Once the threads were cracked loose, the driver can then be used to remove this bushing by hand turning the screwdriver in the larger slot.
Tony
May 2, 2009
Offline
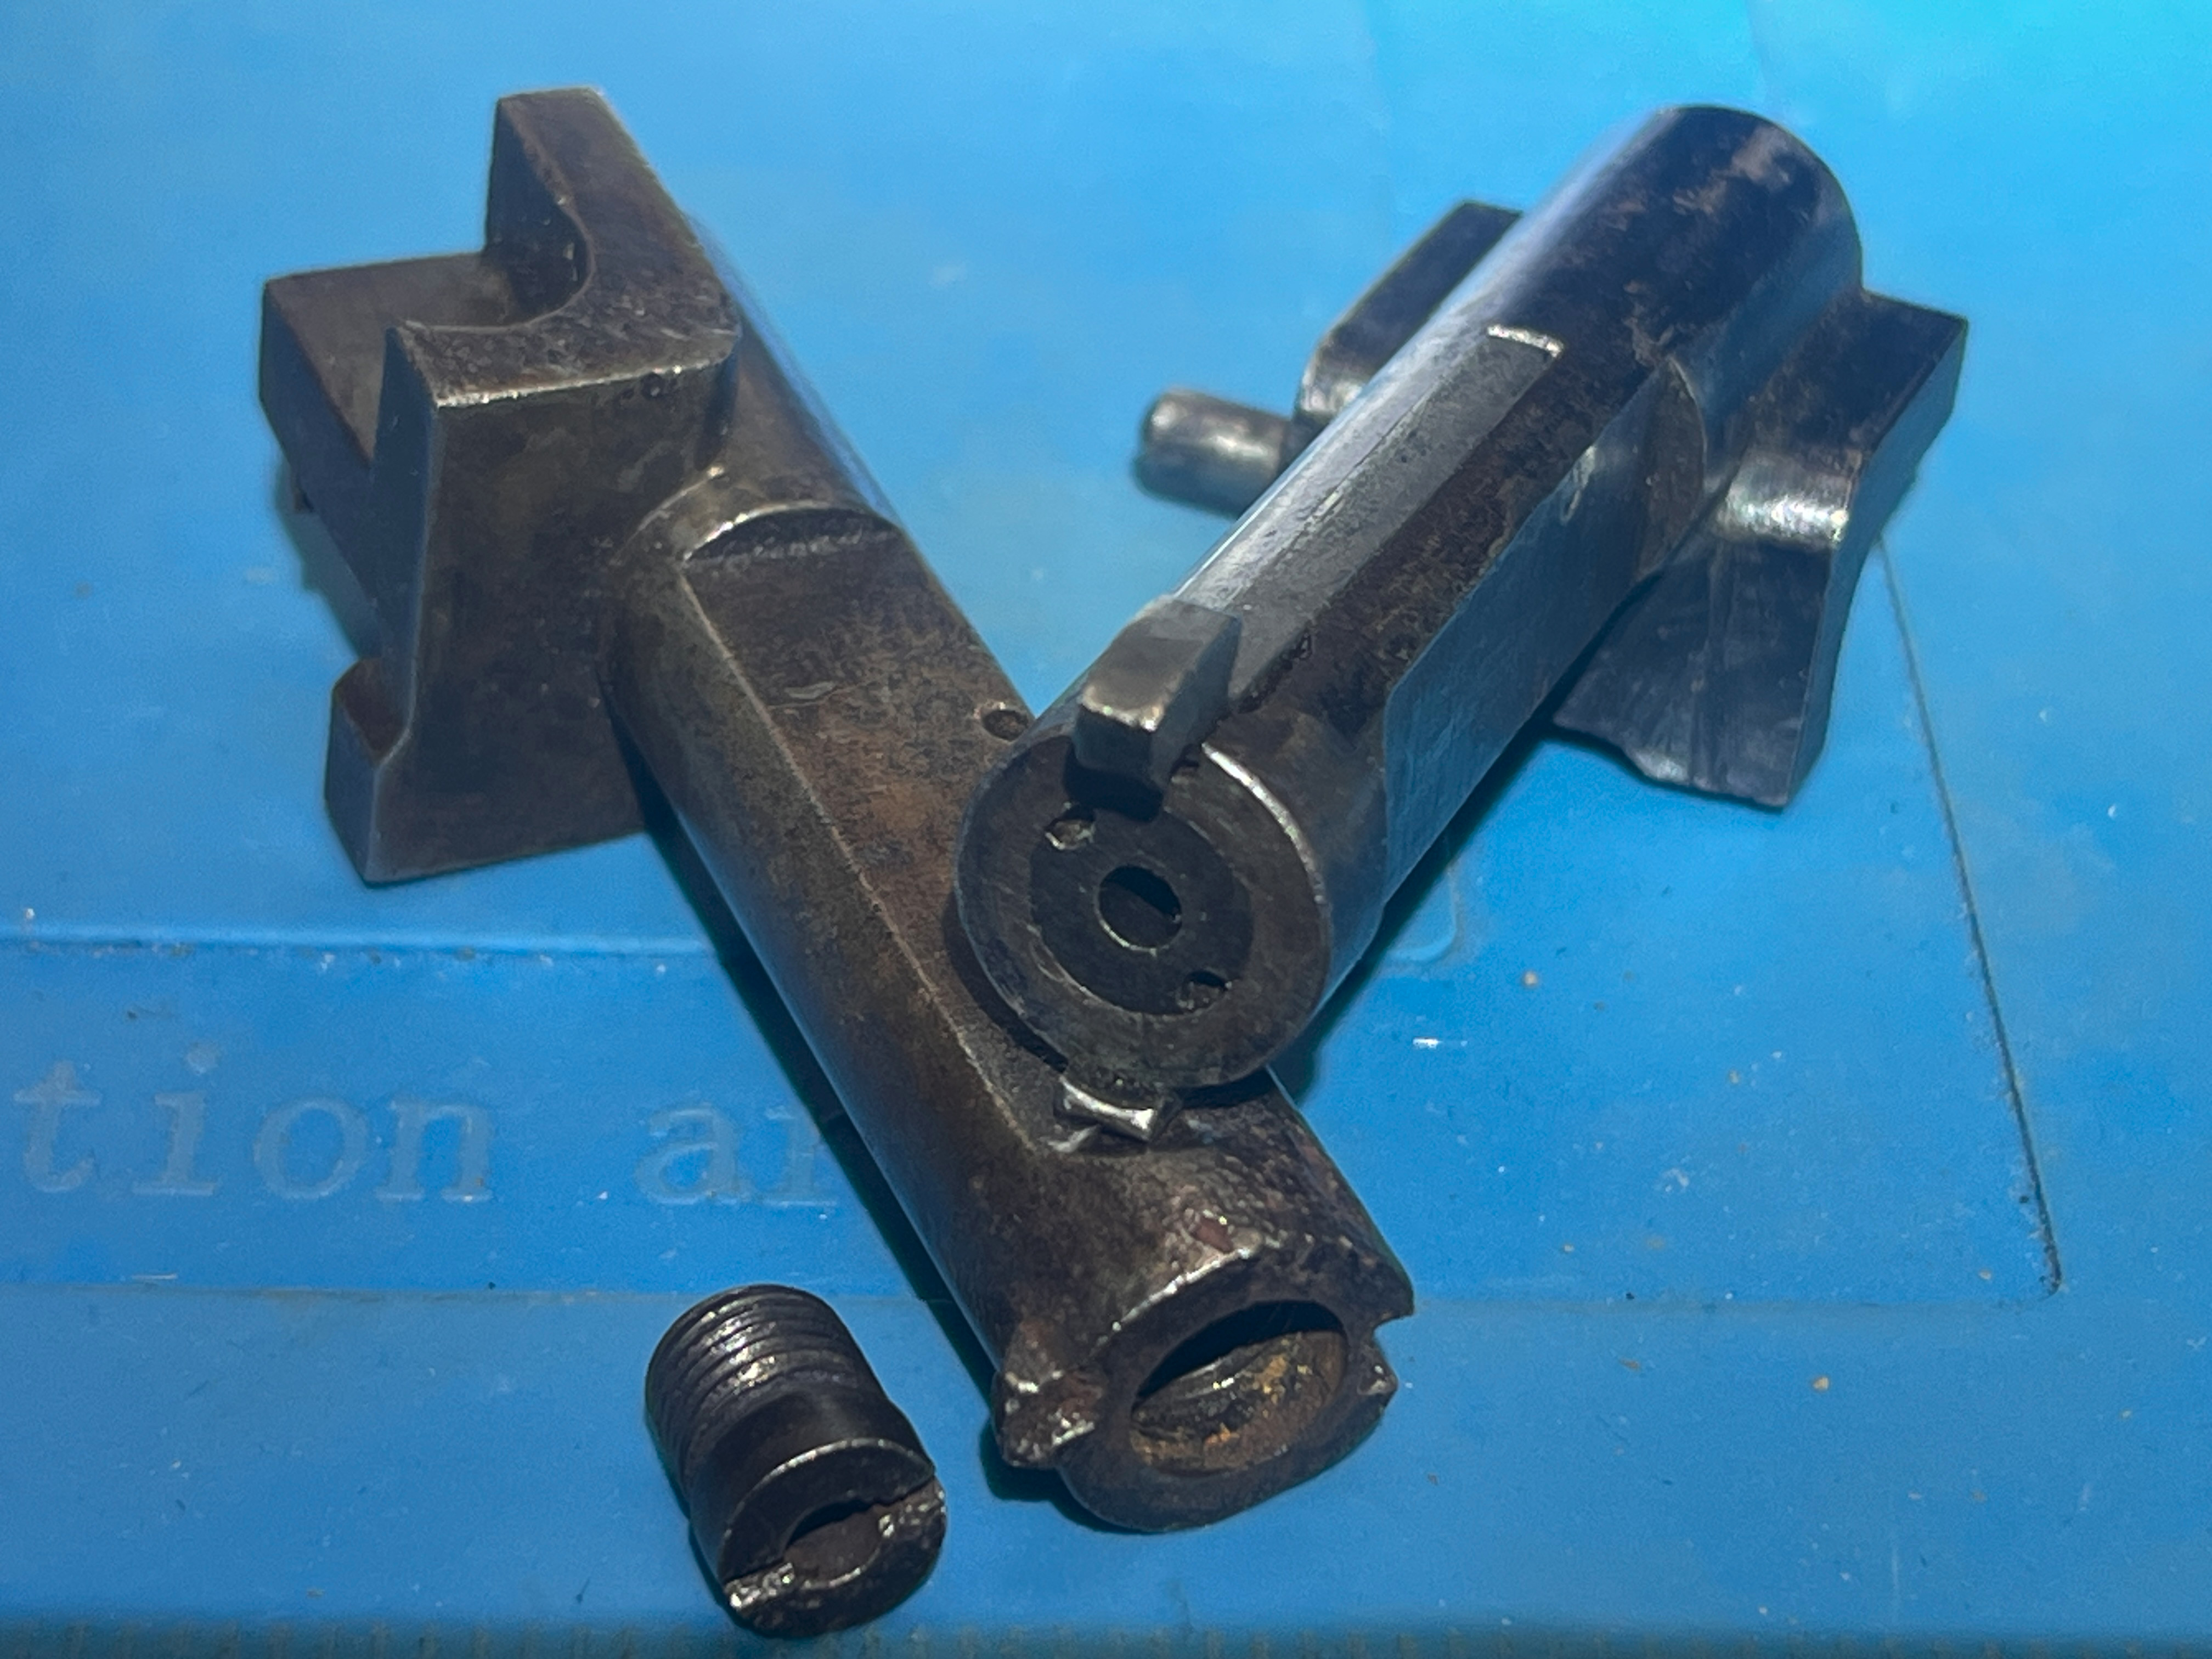
Tony you started a good thread here. We all are learning something new. I looked through my parts box and found another style of bushing so I started to look through my guns and I found that the first models have the scallops and not a slot. Where you would need a special tool to remove it. The one with the slot is second model. I don’t know if there is a exact serial number that they changed but its between 27,000 and 40,000 from a quick look through my gun safe. Tonight I will have more time to look.
Bob
WACA Life Member---
NRA Life Member----
Cody Firearms member since 1991
Researching the Winchester 1873's
Email: [email protected]
December 9, 2002
Offline
1873man said
Tony you started a good thread here. We all are learning something new. I looked through my parts box and found another style of bushing so I started to look through my guns and I found that the first models have the scallops and not a slot. Where you would need a special tool to remove it. The one with the slot is second model. I don’t know if there is a exact serial number that they changed but its between 27,000 and 40,000 from a quick look through my gun safe. Tonight I will have more time to look.
Bob
Thanks Bob,
Very intriguing. IMHO! You’re pictures show us a lot!
Now as I look, I can see the small scallops, vs. the slots! You’re picture of the slotted second model bushing, shows the courser threads, as I guessed they would be a finer thread. That’s the second guess I had wrong in this thread post! LOL!
I’m thinking maybe due to the B/P, that Winchester figured due to moisture seepage into the threads, over time, that the courser threads would be more applicable.
That surely would require a special tool, as a spanner wrench comes to mind as we used to use, for things as were needed. But a specially made hardened tool, wouldn’t be out of the question. Something seewin would make in his shop, as he saw a need for, if he chose. Back in the day before we had the “Crow Foot” wrenches, we would take an extra, open end wrench and cut them on the band saw, and make our own version of a “Crow foot” wrench, welding an old socket we cut apart for the 1/2 inch square drive section to fit on an extension, to remove the hydraulic lines, that we’re stacked up against a bank of hose fittings on the hydraulic control valves, on a said machine as we needed. I remember years ago talking to George Madis on the phone about his tractor, and telling him that story. He had that chuckle for a laugh, that I’ll never forget. Crazy as we would submerse the hot parts we made in oil, to harden them, somewhat. Still have those old homemade tools and such, as we’ll wind up handing them down to a couple youngsters we’re schooling, with mechanical interest, in and out of the family.
Looking forward to you’re added information.
Tony
May 2, 2009
Offline
If I was going to make a tool, I would start with a pipe the right diameter and thickness and then mill or grind away whats not needed.
Bob
WACA Life Member---
NRA Life Member----
Cody Firearms member since 1991
Researching the Winchester 1873's
Email: [email protected]
December 9, 2002
Offline
1873man said
If I was going to make a tool, I would start with a pipe the right diameter and thickness and then mill or grind away whats not needed.
Bob
That’s another good suggestion, applying equal pressure on both notches. That reminds me of an older tool made similar for working on an appliance like a washing machine. In the automotive industry the Spindle Nut wrench set is just that. And the opposite end is usually made for a 1/2 inch extension to fit into a ratchet.
Tony
April 30, 2023
Offline
Anthony said
1873man said
If I was going to make a tool, I would start with a pipe the right diameter and thickness and then mill or grind away whats not needed.
Bob
That’s another good suggestion, applying equal pressure on both notches. That reminds me of an older tool made similar for working on an appliance like a washing machine. In the automotive industry the Spindle Nut wrench set is just that. And the opposite end is usually made for a 1/2 inch extension to fit into a ratchet.
Tony
…and also the homemade tool to breakdown a model 1911 widowmaker shotgun!
December 9, 2002
Offline
Jeremy P said
Anthony said
1873man said
If I was going to make a tool, I would start with a pipe the right diameter and thickness and then mill or grind away whats not needed.
Bob
That’s another good suggestion, applying equal pressure on both notches. That reminds me of an older tool made similar for working on an appliance like a washing machine. In the automotive industry the Spindle Nut wrench set is just that. And the opposite end is usually made for a 1/2 inch extension to fit into a ratchet.
Tony
…and also the homemade tool to breakdown a model 1911 widowmaker shotgun!
Another good point Jeremy!
1873man said
Tony you started a good thread here. We all are learning something new. I looked through my parts box and found another style of bushing so I started to look through my guns and I found that the first models have the scallops and not a slot. Where you would need a special tool to remove it. The one with the slot is second model. I don’t know if there is a exact serial number that they changed but its between 27,000 and 40,000 from a quick look through my gun safe. Tonight I will have more time to look.
Bob
Bob,
The information on the serial number proximity, 27,000-40,000, on the second model is very helpful and informative for collectors, as I know it is for me.
With the image that you provided, that really helps out a lot.
Tony
May 2, 2009
Offline
I have narrowed it down to 28,000 to 31,000. The problem without looking at the guns themselves is most online photos don’t show the bolt face when selling a gun.
Bob
WACA Life Member---
NRA Life Member----
Cody Firearms member since 1991
Researching the Winchester 1873's
Email: [email protected]


1 Guest(s)
